Thứ Tư, 20 tháng 5, 2020

How to Find Your Goals

Ref : https://possibilitychange.com/how-to-find-your-goals/

There’s a lot of information out there about how to achieve your goals. About how to stay motivated, how to focus on your dreams and not be distracted by failure and set backs. But that all assumes that you know what you want out of life, that you already have goals you’re eager to achieve. Recently, in response to a comment I made about pursuing one’s goals on The Change Blog, I got a poignant reply that asked “But what if you haven’t found anything worth doing, any goal worth pursuing?”
Great question – focus is wonderful, but if we aren’t looking at the right things how useful is it? Sure we can learn from failure, but what do we do with those lessons if we’re not really doing anything? How can we find out where we should be looking for our satisfaction in life?

Step 1 – Make a list of what’s important to you.

Do it quickly and without censoring – it’s ok if your list includes your cat or your new shoes. Your choices reflect a snapshot of your life right now and don’t need to be lofty or impressive. Here’s my quick list (in no particular order): my daughter, my friends, writing, coaching, my house, my central heating, my cat, my favorite TV shows (blush), learning, my blog.

Step 2 – Ask “Why is this important?” for each item on your list.

Here are my answers:
  • My daughter because she is my contribution to the world at the most basic level and because she’s fun, loving and makes me happy.
  • My friends because they support me, teach me, and make me laugh.
  • Writing and my blog because they ignite my passion and I feel like I’m able to help people with them. And they’re fun!
  • Coaching because I’m helping my clients live better and clearer lives.
  • My house because it provides me with a beautiful and safe place to be.
  • My central heating because it keeps me warm and comfortable.
  • My favorite TV shows because they take me to places where life is silly and adventurous and because they often provide me with a fascinating glimpse into human nature.
  • Learning because it makes me a better person and helps me grow.

Step 3 – Use your answers to identify your values.

Look for themes in your answers. When you read over your list, what pops out at you? What shows up more than once? Are there items that have something in common? I see the following themes in my list: contribution, fun & laughter, learning, helping people, comfort.
The themes we identify reflect our values and what’s most important to us in our lives. And this is where goal setting should begin.

Step 4 – Use your values to set your goals.

The goals that inspire you most will be based on your values, on what’s really important to you. You might already be working on some of them – I’ve set clear goals around my writing and am beginning to revamp my coaching practice. But when I look at my list I realize that I’m not putting much effort to making sure that I have enough fun and laughter in my life right now, so I might want to set a goal to find more ways to play.
When you set your goals:
  • Make your goals bite-sized – A goal of “Learn the skills I need for my next promotion” sounds achievable, while a goal of “Become CEO by the time I’m 30” is probably going to set you up for failure.
  • Make your goals positive – You should work toward what you want, not away from what you don’t want. “I want to find a loving partner” inspires while “I don’t want to be lonely anymore” already feels defeated.
  • Realize that as you work toward your goals they’ll probably change – As we learn and grow from the work we do to move toward our goals we often connect with new, more resonant goals. After I set up my coaching practice I started writing newsletters to attract more clients. But I found that I loved writing as much as I loved coaching, and my goal shifted from attracting clients to creating a blog.
The bottom line is that when our goals tap into the beauty and energy of our values they make our hearts sing. They feed our hungers, we can’t wait to get started working on them. So my answer to the reader who asked about finding a goal worth pursuing is that the answer is in your heart, it’s in your longings, it’s in the things you want more of.

Thứ Ba, 10 tháng 3, 2020

Tìm hiểu Domain Driven Design (DDD)

Trong thiết kế kiến trúc Microservice, có thể bạn sẽ được nghe nhiều về thuật ngữ Domain Driven Design, một phương pháp thiết kế phần mềm theo hướng business domain. Phương pháp này được giới thiệu bởi Eric Evan, viết thành một cuốn sách dày cộp bán trên Amazon, mình đã đọc cuốn sách này cả phiên bản tiếng Anh và tiếng Việt. Tuy nhiên câu từ trong cuốn này xác cmnd là éo hiểu gì, chữ viết như giun bò, kiến chạy, dài dòng lê thê, có lẽ cỡ như Bill Gate mới hiểu được.
Thế rồi một đêm xem xvideo, lướt vài vòng webtretho nghe các mẹ tâm sự chuyện tâm sinh lý, mình mới chợt ngộ ra bí ẩn trong cuốn sách của Eric Evan, quả là một bầu trời kiến thức, bài viết này sẽ mô tả lại phương pháp này một cách giản đơn, để cỡ như JAV idol như Yuina Hatano cũng hiểu được

Vì sao lại đẻ ra DDD (Domain Driven Design)

Giả sử một anh dev được giao nhiệm vụ phát triển một ứng dụng bán hàng online. Thanh niên coder thì sẽ áp dụng mô hình quen thuộc MVC hay MVVM
Image result for Model view controller source
Nhìn source code thì kiểu thế này
Image result for Model view controller source structure
OK, cool, tuy nhiên đem cấu trúc này cho một BA (Business Analysis) thì anh ta lại không hiểu controller, view là cái giề. Anh ấy chỉ biết về nghiệp vụ bán hàng, order online, thanh toán thì đi theo flow abc, xyz. Còn chú coder thì biết mỗi Java, .NET design pattern. Kiểu nhưng 1 anh tàu nói tiếng Chinese với 1 anh US. Như vậy phải có 1 phương pháp nào đó để anh dev và anh BA có thể ngồi được với nhau sử dụng 1 ngôn ngữ chung để cả 2 có thể hiểu, và Domain Driven Design ra đời.

DDD là gì

DDD không phải là công nghệ gì cả, nó là một design pattern, một phương pháp thiết kế phần mềm, nhìn trên góc độ architect. Trong đó ứng dụng sẽ được chia thành 4 layer như ở dưới
architect
Đoạn định nghĩa này lấy nguồn trên internet cho nhanh
User  Interface Layer:  làm nhiệm vụ biểu diễn thông tin trực quan cho user và dịch các user command ( ở đây chúng ta có thể hiểu là các event xảy ra trên giao diện khi được trigger ( nhấn nút trên các UI input control ) là các sẽ được dịch thành các command xử lý ở các tầng dưới.
Application Layer: Tầng này được thiết kế khá mỏng ( thin ) với ít logic xử  lý chỉ để làm nhiệm vụ coordinate các Activity của Application và không chứa Business Logic, nó không chứa state của các Business Object mà chỉ chứa state của Application Task Progress. Chúng ta có thể hình dung phần này gần giống với các Controller trong mô hình MVC chỉ làm nhiệm vụ forward các task đến nơi cần xử lý.
Domain Layer: Đây là trái tim của ứng dụng ( Business Software ), các  state của Business Object đều nằm ở đây. Việc lưu trữ ( persistence ) các Business Object và các state của nó được chuyển giao cho tầng Infrastructure ở dưới.
Trái tim của mô hình này chính là ở phần Domain Layer, các nghiệp vụ sẽ được mô tả tại đây, và cấu trúc source code cũng được tổ chức theo tên các nghiệp vụ chứ không để kiểu view, controller như truyền thống
Chẳng hạn như Order App thì chia thành thư mục hướng nghiệp vụ như Buyer, Order… Như vậy anh BA nhìn vào có thể hiểu ngay là app này có chức năng gì
Image result for domain driven design source structure
Infrastructure Layer:  Đóng vai trò cung cấp thư viện ( supporting libraries )cho các tầng khác. Nó cung cấp cơ chế giao tiếp ( communication ) giữa các Layer  với nhau, cũng như cung cấp các chức năng khác như lưu trữ ( persistence ) các Business Object của tầng Domain.
Cái tầng Infrastructure Layer dễ làm người đọc lầm lẫn sang hạ tầng phần cứng như máy chủ, database server, nhưng thật ra không phải, do chú tây viết sách thích tỏ ra nguy hiểm. Còn trong DDD, layer này có thể hiểu như tầng common library như logging, utility và phần data persistent layer của tầng Data Access trong mô hình thông thường, tức là vẫn chỉ là phần mềm


DDD vs Mô hình 3 lớp truyền thống

So sánh DDD với mô hình 3 lớp truyền thống có thể ví như cái nhà ống 3 tầng có cấu thang bộ với nhà 4 tầng có thêm thang máy
Mô hình 3 lớp truyền thống, tầng 3 (Presentation) muốn xuống tầng 1 (Data Tier) phải qua tầng 2 Business Tier
Image result for 3 layer architecture
Mô hình DDD thì tầng 4 (UI) muốn xuống tầng 1 (Persistence) có thể qua thang máy là (Infrastructure) để xuống luôn cho nhanh, có muốn tập thể dục thì đi tuần tự từng tầng như truyền thống.
Image result for Domain driven architecture

Thuật ngữ trong DDD

Mỗi lĩnh vực (domain) trong cuộc sống đều có thuật ngữ khác nhau. Dramma hàn quốc thì có thuật ngữ như uppa, ung thư. Kiếm hiệp Hoa Ngữ thì có tuyệt chiêu, bí kíp, kiếm pháp. Chính trị thì có tư tưởng HCM, lý luận Đặng Tiểu Bình, cách mạng, đường lối chính sách. DDD cũng có những thuật ngữ riêng như Entity, Value Object, Aggregate vân vân và mây mây. Cuốn sách của Evic giải thích thì vô cùng khó hiểu. Tuy nhiên giaosucan’s blog sẽ giải thích dần dần cho các bạn những thuật ngữ này theo cách đơn giản nhất trong các phần sau…

Thứ Sáu, 31 tháng 1, 2020

Token Based Authentication In .NET Core And JWT

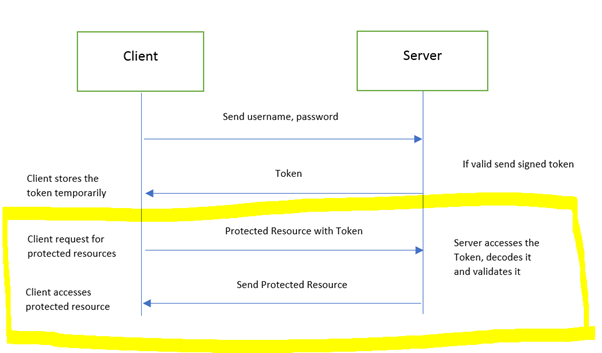
JWT is common format of token-based implementation. it is so popular right now that has become standard for token-based authentication.
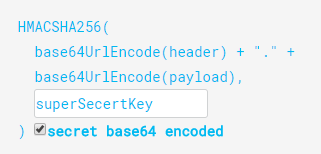
JWT is composed of three components, separate by a dot(.)
Token Based Authentication .NET Core And JWT
Header
Header contains standard information. i.e., type of token and the name of the algorithm. The information is coded in base64 format.
Example -
  1. {  
  2.    "alg""HS256",  
  3.    "typ""JWT"  
Payload
Payload is json data contains information of user. It can but does not have to be limited to the data of regarding user, claim and other necessary data can also be there.
Example -
  1. {  
  2.    “issuer”: “http://www.exampleweb.com”,  
  3.    “expires”: “2015-11-18T18:25:43.511Z”  
  4. }  
Signature
Signature is "digital signature" of the combination of header and payload. Signature helps server verify the authenticity of the content of  of JWT against malicious alteration of content.
Token Based Authentication .NET Core And JWT


Implementation 

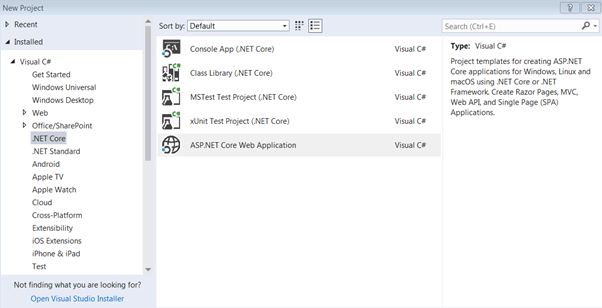
Let’s implement this concept through ASP.NET Core. Open Visual Studio and select .NET Core->ASP.NET Core Web Application.
 
Token Based Authentication .NET Core And JWT
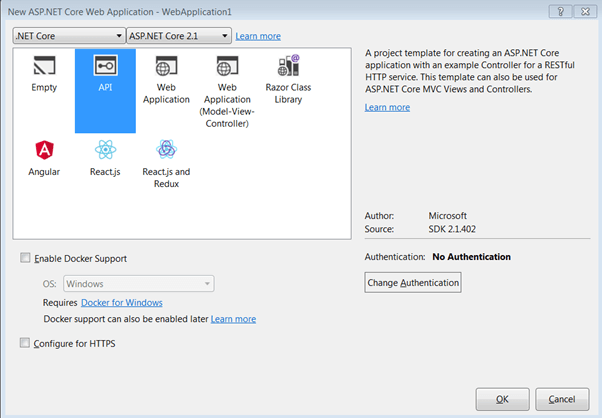
Select “API” project type…
 
Token Based Authentication .NET Core And JWT
 
Run the application and probably you will be getting this output 
 
Token Based Authentication .NET Core And JWT
 
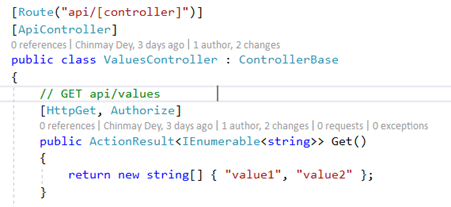
This indicates  thatGET in “values” controller is open to everyone. There are no restrictions at all. Let’s assume we have a scenario that only authenticated users can access this URL. To hide this from the public and be accessible to an authenticated user I will decorate with “Authorize” attribute.
 
Token Based Authentication .NET Core And JWT
 
Also, add authentication in HTTP Request Pipeline. 
  1. public void Configure(IApplicationBuilder app, IHostingEnvironment env)  
  2. {  
  3. .  
  4. .  
  5. .  
  6. app.UseAuthentication();   
  7. app.UseMvc();  
  8. }  
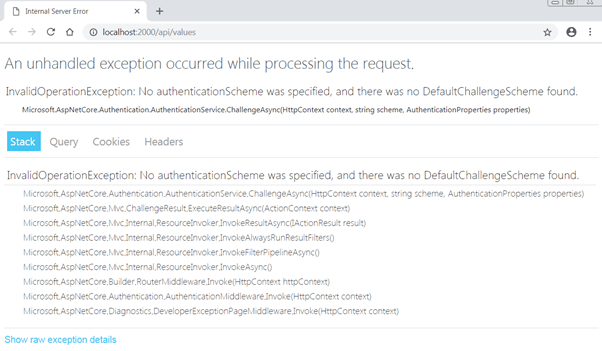
 Now, if you want to access this end, you are probably getting this error.
 
Token Based Authentication .NET Core And JWT
It suggests (ignore the poor implementation of error handling), we are allowing the URL to authenticated users only.
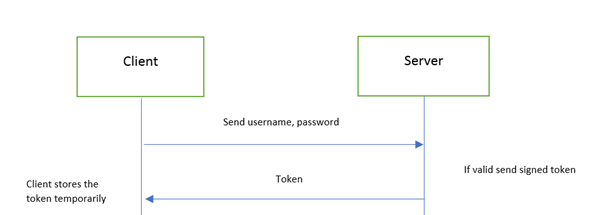
Great, the securing of resource part is done. Next, we need a mechanism to generate a token for valid users. For that, we will add a controller, AuthController, which will ingest login credentials (username and password), validate the user and generate a token.
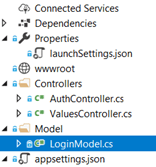
For that, add a model class “LoginModel” to hold “UserName” and “Password” and a new controller, “AuthController”.
 
Token Based Authentication .NET Core And JWT
 
Add this code to “LoginModel”.
  1. public class LoginModel  
  2. {  
  3.     public string UserName { get; set; }  
  4.     public string Password { get; set; }  
  5. }  
Add this code in “AuthController”.
  1. Route("api/[controller]")]  
  2.     [ApiController]  
  3.     public class AuthController : ControllerBase  
  4.     {  
  5.         // GET api/values  
  6.         [HttpPost, Route("login")]  
  7.         public IActionResult Login([FromBody]LoginModel user)  
  8.         {  
  9.             if (user == null)  
  10.             {  
  11.                 return BadRequest("Invalid request");  
  12.             }  
  13.               
  14.             if (user.UserName == "johncitizen" && user.Password == "abc@123")  
  15.             {  
  16.                 var secretKey = new SymmetricSecurityKey(Encoding.UTF8.GetBytes("KeyForSignInSecret@1234"));  
  17.                 var signinCredentials = new SigningCredentials(secretKey, SecurityAlgorithms.HmacSha256);  
  18.   
  19.                 var tokeOptions = new JwtSecurityToken(  
  20.                     issuer: "http://localhost:2000",  
  21.                     audience: "http://localhost:2000",  
  22.                     claims: new List<Claim>(),  
  23.                     expires: DateTime.Now.AddMinutes(30),  
  24.                     signingCredentials: signinCredentials  
  25.                 );  
  26.   
  27.                 var tokenString = new JwtSecurityTokenHandler().WriteToken(tokeOptions);  
  28.                 return Ok(new { Token = tokenString });  
  29.             }  
  30.             else  
  31.             {  
  32.                 return Unauthorized();  
  33.             }  
  34.         }  
  35.     }  
As you can see “AuthController" has a login action which requires “LoginModel” as input for username and password.
Login action validates the user with hardcoded username and password (for the sake for simplicity, although practically this validation should be done through the database). This “token” action generates token and sends to the client if credentials are valid. It will send “unauthorized” error if credentials are not matching.
If you look closely at the structure of the token it contains some necessary information. It has issuer, audience, claims, and expiry time which is part of the payload. “JwtSecurityTokenHandler” takes care of adding header and adding a signature. Note that claims list is empty as I am not implementing role-based authorization in this article.
With this, we have completed the implementation of token generation and sending part.
Token Based Authentication .NET Core And JWT
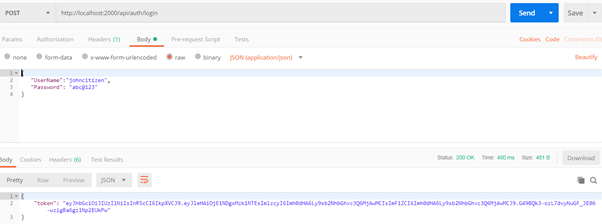
Let’s test this application. We will use “Postman” tool to access the “Login”, pass valid credentials, and get the token.
Now, run the application and to test login, open postman. Change the header, content-type to “application/json”.
 
Token Based Authentication .NET Core And JWT
Add valid username and password (JSON format) in body.
  1. {  
  2.    "UserName":"johncitizen",  
  3.    "Password""abc@123"  
  4. }   

Token Based Authentication .NET Core And JWT
If you send these details, the server will provide a token.
So, by this, we have configured a token providing server. Although we have a token the application is not equipped to handle and interpret the token. We need to add capability, so client request token can be understood by the server.
Add this code in “ConfigureServices” method, in "startup.cs class".
  1. public void ConfigureServices(IServiceCollection services)  
  2.        {  
  3.            services.AddAuthentication(JwtBearerDefaults.AuthenticationScheme)  
  4.            .AddJwtBearer(options =>  
  5.            {  
  6.                options.TokenValidationParameters = new TokenValidationParameters  
  7.                {  
  8.                    ValidateIssuer = true,  
  9.                    ValidateAudience = true,  
  10.                    ValidateLifetime = true,  
  11.                    ValidateIssuerSigningKey = true,  
  12.   
  13.                    ValidIssuer = "http://localhost:2000",  
  14.                    ValidAudience = "http://localhost:2000",  
  15.                    IssuerSigningKey = new SymmetricSecurityKey(Encoding.UTF8.GetBytes("KeyForSignInSecret@1234"))  
  16.                };  
  17.            });  
  18.   
  19.            services.AddMvc().SetCompatibilityVersion(CompatibilityVersion.Version_2_1);  
  20.        }  
If you notice we are making the application aware of JWT authentication and asking to validate token contents; i.e., Issuer, Audience, Lifetime (expiry of the token) and digital signature. Also note we need to supply ValidIssuer, ValidAudience, and IssuerSigningKey exactly the same as we did at the time of writing token generation. The reason behind is token extraction and generation should share the same logic.
This completes the second part of the request, i.e. sending a token to the resource server, authentication and returning resource if the token is valid. 
Token Based Authentication .NET Core And JWT
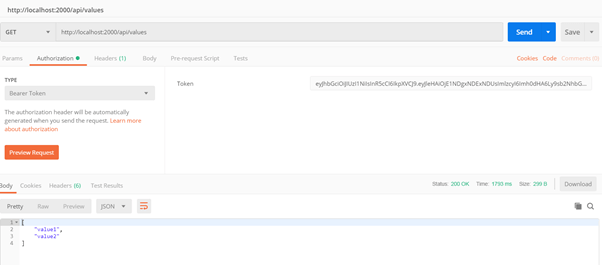
To test this, we will first generate the token (through login URL and user credentials) in postman (like we did before), copy the token.
Open another postman tab/instance, put values URL, select type “Bearer Token” and paste the above-generated token. Send the request and you should get the response. 
 
Token Based Authentication .NET Core And JWT
 
Happy coding!!!