Thứ Sáu, 31 tháng 1, 2020

Token Based Authentication In .NET Core And JWT

JWT is common format of token-based implementation. it is so popular right now that has become standard for token-based authentication.
JWT is composed of three components, separate by a dot(.)
Token Based Authentication .NET Core And JWT
Header
Header contains standard information. i.e., type of token and the name of the algorithm. The information is coded in base64 format.
Example -
  1. {  
  2.    "alg""HS256",  
  3.    "typ""JWT"  
Payload
Payload is json data contains information of user. It can but does not have to be limited to the data of regarding user, claim and other necessary data can also be there.
Example -
  1. {  
  2.    “issuer”: “http://www.exampleweb.com”,  
  3.    “expires”: “2015-11-18T18:25:43.511Z”  
  4. }  
Signature
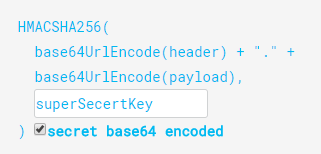
Signature is "digital signature" of the combination of header and payload. Signature helps server verify the authenticity of the content of  of JWT against malicious alteration of content.
Token Based Authentication .NET Core And JWT


Implementation 

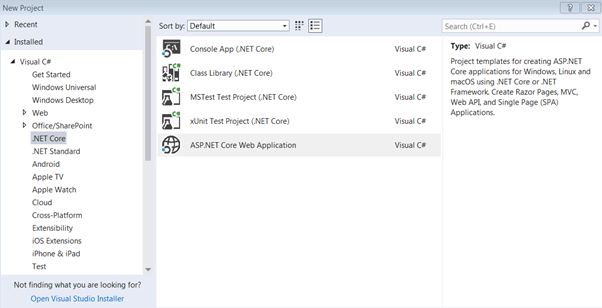
Let’s implement this concept through ASP.NET Core. Open Visual Studio and select .NET Core->ASP.NET Core Web Application.
 
Token Based Authentication .NET Core And JWT
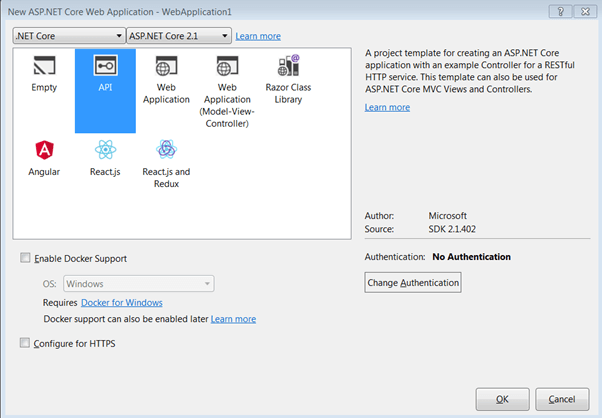
Select “API” project type…
 
Token Based Authentication .NET Core And JWT
 
Run the application and probably you will be getting this output 
 
Token Based Authentication .NET Core And JWT
 
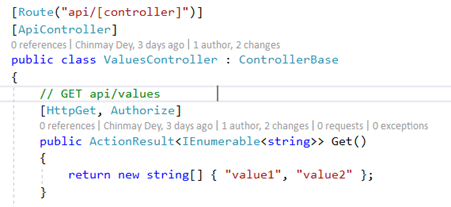
This indicates  thatGET in “values” controller is open to everyone. There are no restrictions at all. Let’s assume we have a scenario that only authenticated users can access this URL. To hide this from the public and be accessible to an authenticated user I will decorate with “Authorize” attribute.
 
Token Based Authentication .NET Core And JWT
 
Also, add authentication in HTTP Request Pipeline. 
  1. public void Configure(IApplicationBuilder app, IHostingEnvironment env)  
  2. {  
  3. .  
  4. .  
  5. .  
  6. app.UseAuthentication();   
  7. app.UseMvc();  
  8. }  
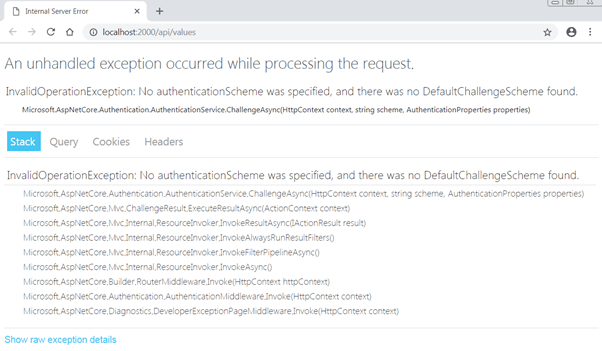
 Now, if you want to access this end, you are probably getting this error.
 
Token Based Authentication .NET Core And JWT
It suggests (ignore the poor implementation of error handling), we are allowing the URL to authenticated users only.
Great, the securing of resource part is done. Next, we need a mechanism to generate a token for valid users. For that, we will add a controller, AuthController, which will ingest login credentials (username and password), validate the user and generate a token.
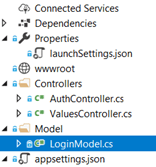
For that, add a model class “LoginModel” to hold “UserName” and “Password” and a new controller, “AuthController”.
 
Token Based Authentication .NET Core And JWT
 
Add this code to “LoginModel”.
  1. public class LoginModel  
  2. {  
  3.     public string UserName { get; set; }  
  4.     public string Password { get; set; }  
  5. }  
Add this code in “AuthController”.
  1. Route("api/[controller]")]  
  2.     [ApiController]  
  3.     public class AuthController : ControllerBase  
  4.     {  
  5.         // GET api/values  
  6.         [HttpPost, Route("login")]  
  7.         public IActionResult Login([FromBody]LoginModel user)  
  8.         {  
  9.             if (user == null)  
  10.             {  
  11.                 return BadRequest("Invalid request");  
  12.             }  
  13.               
  14.             if (user.UserName == "johncitizen" && user.Password == "abc@123")  
  15.             {  
  16.                 var secretKey = new SymmetricSecurityKey(Encoding.UTF8.GetBytes("KeyForSignInSecret@1234"));  
  17.                 var signinCredentials = new SigningCredentials(secretKey, SecurityAlgorithms.HmacSha256);  
  18.   
  19.                 var tokeOptions = new JwtSecurityToken(  
  20.                     issuer: "http://localhost:2000",  
  21.                     audience: "http://localhost:2000",  
  22.                     claims: new List<Claim>(),  
  23.                     expires: DateTime.Now.AddMinutes(30),  
  24.                     signingCredentials: signinCredentials  
  25.                 );  
  26.   
  27.                 var tokenString = new JwtSecurityTokenHandler().WriteToken(tokeOptions);  
  28.                 return Ok(new { Token = tokenString });  
  29.             }  
  30.             else  
  31.             {  
  32.                 return Unauthorized();  
  33.             }  
  34.         }  
  35.     }  
As you can see “AuthController" has a login action which requires “LoginModel” as input for username and password.
Login action validates the user with hardcoded username and password (for the sake for simplicity, although practically this validation should be done through the database). This “token” action generates token and sends to the client if credentials are valid. It will send “unauthorized” error if credentials are not matching.
If you look closely at the structure of the token it contains some necessary information. It has issuer, audience, claims, and expiry time which is part of the payload. “JwtSecurityTokenHandler” takes care of adding header and adding a signature. Note that claims list is empty as I am not implementing role-based authorization in this article.
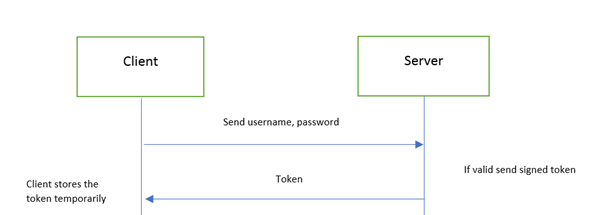
With this, we have completed the implementation of token generation and sending part.
Token Based Authentication .NET Core And JWT
Let’s test this application. We will use “Postman” tool to access the “Login”, pass valid credentials, and get the token.
Now, run the application and to test login, open postman. Change the header, content-type to “application/json”.
 
Token Based Authentication .NET Core And JWT
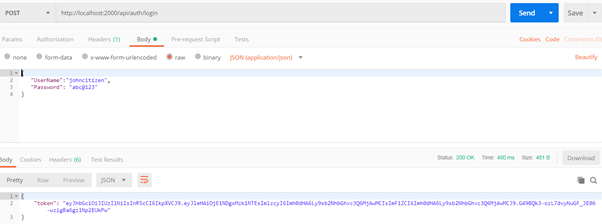
Add valid username and password (JSON format) in body.
  1. {  
  2.    "UserName":"johncitizen",  
  3.    "Password""abc@123"  
  4. }   

Token Based Authentication .NET Core And JWT
If you send these details, the server will provide a token.
So, by this, we have configured a token providing server. Although we have a token the application is not equipped to handle and interpret the token. We need to add capability, so client request token can be understood by the server.
Add this code in “ConfigureServices” method, in "startup.cs class".
  1. public void ConfigureServices(IServiceCollection services)  
  2.        {  
  3.            services.AddAuthentication(JwtBearerDefaults.AuthenticationScheme)  
  4.            .AddJwtBearer(options =>  
  5.            {  
  6.                options.TokenValidationParameters = new TokenValidationParameters  
  7.                {  
  8.                    ValidateIssuer = true,  
  9.                    ValidateAudience = true,  
  10.                    ValidateLifetime = true,  
  11.                    ValidateIssuerSigningKey = true,  
  12.   
  13.                    ValidIssuer = "http://localhost:2000",  
  14.                    ValidAudience = "http://localhost:2000",  
  15.                    IssuerSigningKey = new SymmetricSecurityKey(Encoding.UTF8.GetBytes("KeyForSignInSecret@1234"))  
  16.                };  
  17.            });  
  18.   
  19.            services.AddMvc().SetCompatibilityVersion(CompatibilityVersion.Version_2_1);  
  20.        }  
If you notice we are making the application aware of JWT authentication and asking to validate token contents; i.e., Issuer, Audience, Lifetime (expiry of the token) and digital signature. Also note we need to supply ValidIssuer, ValidAudience, and IssuerSigningKey exactly the same as we did at the time of writing token generation. The reason behind is token extraction and generation should share the same logic.
This completes the second part of the request, i.e. sending a token to the resource server, authentication and returning resource if the token is valid. 
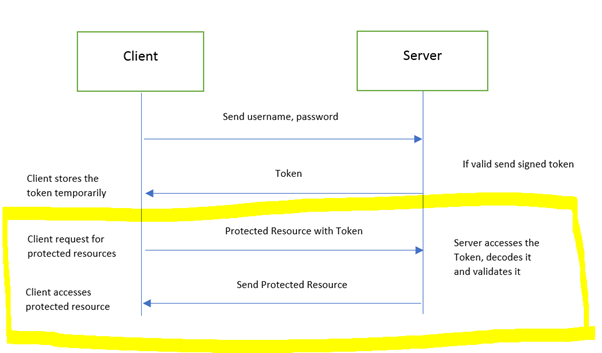
Token Based Authentication .NET Core And JWT
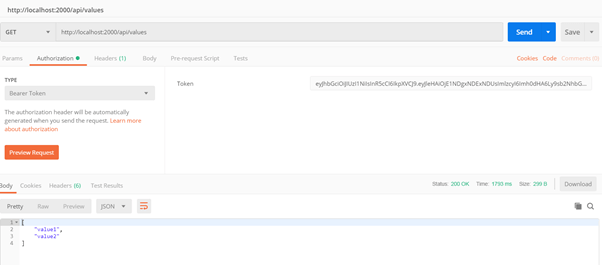
To test this, we will first generate the token (through login URL and user credentials) in postman (like we did before), copy the token.
Open another postman tab/instance, put values URL, select type “Bearer Token” and paste the above-generated token. Send the request and you should get the response. 
 
Token Based Authentication .NET Core And JWT
 
Happy coding!!!

Thứ Sáu, 17 tháng 1, 2020

angular with keyword: "ng"

Chú ý, khi sử dụng ngModel trong một form html. Bắt buộc phải có attribute name. Nếu không có thì sẽ bị báo lỗi như sau:
If ngModel is used within a form tag, either the name attribute must be set or the form control must be defined as 'standalone' in ngModelOptions.
Chúng ta sẽ có các class tự động sinh ra ở input type="text" như sau:
  • ng-untouched - Class CSS này nghĩa là page đã load xong và input chưa được đụng đũa vào.
  • ng-touched - Người dùng đã sờ vào control, ví dụ dí chuột hoặc nhấn chuột vào nó.
  • ng-pristine - Class này nghĩa là input có giá trị được bind sẵn vào nhưng chưa bị sửa đổi
  • ng-dirty - Giá trị bên trong đã bị sửa đổi, người dùng đã chọc ngoáy vào
  • ng-valid - Người dùng nhập giá trị hợp lệ
  • ng-invalid - Người dùng nhập giá trị dữ liệu không hợp lệ. Ví dụ bỏ trống một input required
Các class sẽ tự động sinh ra và gắn vào input mỗi khi có sự thay đổi dữ liệu trên form. Và nhiệm vụ của bạn là định nghĩa css style tương ứng với các thay đổi đó. Ví dụ:
.ng-invalid{
    background: orange;
}
Sau khi áp dụng style thì sẽ như sau:

5. ngModule

Module là một khái niệm rộng nhất của Angular. Một module có thể bao gồm chứa các components, directives, pipes, v.v.
Module có thể được biên dịch (compile) dưới dạng ahead-of-time (AoT). Nghĩa là biên dịch ra mã thực thi để hiện ra luôn trên trình duyệt không cần vẽ vời gì từ đầu. Hãy tưởng tượng component có html và js viết riêng, khi load trang thì 2 thứ này mới nhào nặn chung để hiển thị html+data lên màn hình. AoT là thứ html+data đã nhào sẵn.
Module cũng có thể gọi module con và bắt tay được với các module khác.
Ví dụ về module chúng ta có thể bắt gặp ngay ở trong app.module.ts
import { NgModule }      from '@angular/core';
import { BrowserModule } from '@angular/platform-browser';
import { MyAppComponent }  from './app.component';

@NgModule({
  imports:      [ BrowserModule ],
  declarations: [ MyAppComponent ],
  bootstrap:    [ MyAppComponent ]
})
export class MyAppModule { }
Như vậy thì bản thân một app Angular chính là một module khổng lồ, trong đó cài cắm nhiều module con.
Các thuộc tính của module được định nghĩa như sau:
  • imports: Định nghĩa sự phụ thuộc (Dependency) của module này, module phụ thuộc sẽ được load trước rồi module này mới load.
  • declarations: Định nghĩa tất cả các component sẽ được dùng trong module này. Nếu chưa định nghĩa thì các component trong module sẽ không thể gọi nhau vì không tìm thấy nhau
  • bootstrap: Mỗi ứng dụng Angular đều cần một module gốc, module này sẽ có một component gốc chứa layout gốc sẽ được render ra ở file index.html.

Thứ Năm, 9 tháng 1, 2020

Angular 8 add bootstrap to project


Bootstrap is the world’s most popular framework for building responsive, and mobile-first sites while Angular is one of the most powerful JavaScript framework. There are three(3) major ways to add bootstrap to our angular project.
Method 1: Using Angular CLI (npm install).
Method 2: Using CDN (Copy and Paste method).
Method 3: Adding bootstrap CSS files to your project (Using CSS import ).
I will be focusing on method 1 and 2 in this publication.
Get Started: You are expected to have installed nodejs on your machine if not, it can be foundhttps://nodejs.org: download and install. Let’s start with installing angular using Command Line Interface (CLI) from NPM package.
npm install -g @angular/cli
let’s create a new angular project using command line interface (CLI).
ng new AngularBootstrap
You can add additional features when you are generating your angular project from CLI just as type of styling, by default styling is css. If you want to powerfull styling like SCSS in your project ( $ ng new AngularBootstrap — style=scss)
cd AngularBootstrap
If you are using VS code on your window machine just enter $ code . to open the project.
Method 1: Using Angular CLI (npm install). From the command line interface install bootstrap and references it in angular.json
npm install bootstrap --save
If you want to use bootstrap Javascript function, you need to install JQuery and popperjs with it. BootstrapJS depends on JQuery
npm install jquery --save
If you need the functionality of a popover in angular application, you can add popper.js. You can learn more on this https://popper.js.org/index.html#example10
npm install popper.js --save
Reference the path in angular.json file. Make sure you reference it under build node. 
Method 2: Using CDN (CDN Referenced method).
This is an old way of referencing bootstrap in our project most especially in Angular 1, the url to the path is added to the index.html for global referenced. For more information go to https://www.getbootstrap.com/
Method 3: Adding bootstrap CSS files to your project:
You can direct add bootstrap folders to your asset directory in your angular project and reference the folder directly into your style.css or style.scss using
@import url("bootstrap.min.css"); 


Extra:- Font-awesome is the one of the most popular place to get icon to use for web design. You can add font-awesome icon to your angular project using npm, and reference the css in your angular.json file.
npm install font-awesome 
Conclusion: In this publication, I have shown you, how to kickstart your angular project using bootstrap library. kindly click on the clap button. If you have any question contact me sensationalkunlex@gmail.com or sensationalkunlex@live.com